Jun 24, 2013

Front Suspension Volvo 122S

All the rubber bushings were probably over 40 years old, the ball joints and shocks were still original, surface rust had replaced most of the paint... Time for some renovating!

Front Suspension Volvo Amazon
Front Suspension Volvo 122S

Front Suspension Volvo Amazon 1969
Upper wishbone - front axle Volvo 122S

Rusty subframe Volvo 122S 1969
Rusty subframe

All the bolts and nuts were soaked in WD40 a couple of days before I started. First take of the stabilizer and take out the shocks. Then you can start with the ball joints, I started with the lower ball joint. But... before you start you have to secure the spring so it won't jump out when it releases it's tension all of a sudden. I took a long thread with 2 big washers and two nuts, mounted it in the holes for the shocker and turned the nuts until the spring was under pressure.

Suspension Volvo 122S - Securing the spring with a long thread
Securing the spring with a long thread

Ball joint splitter
Ball joint splitter

You can try to hammer the lower ball joint out but it's better to use a ball joint splitter. Just turn the nut on the splitter until you hear a big bang, .. it's loose. :). Now you can slowly remove the tension from the thread until the spring is tension free, remove the big bolt from the lower wishbone and take it off. The upper ball joint is a bit simpler, just take out the bolts and it's loose Don't forget to support the wheel hub. 

Supporting the sub frame of the 122S

I put 2 jacks under the subframe and secured it with a rope on the engine crane before loosening the bolts.

Taking out the sub frame Volvo Amazon
Securing the sub frame

Then the worst part... cleaning all the greasy and rusty parts. 

Subframe - Front axle Volvo Amazon before painting
Subframe - Front axle Volvo 122S before painting

Cleaning the lower wishbone of the Volvo Amazon
Cleaning the lower wishbone of the Volvo 122S

Lower wishbone, spring, the old and new ball joint and bushes

If you want to replace the bushes and sleeves in the lower wishbone you need a press. It's possible to get the old ones out with a bench swivel, but to put the new ones in without damaging the wishbone is something I couldn't do myself. So I brought them to Sam and 10 minutes later it was done. 

Pressing out the old bushes lower wishbone Volvo 122S
Pressing out the old bushes

Putting everything back together can be done in reverse order: Bolt on the front axle, the upper wishbones and the new upper ball joints. In order to place the bolt which locate the joint in the stub axle I used a clamp. I used the torque settings from Haynes but.. The torque for the ball joint are incorrect! According to Haynes it should be 90 kg fm for the uper ball joint bolts... result a broken high tensile bolt. A better torque is 40 kg fm for the upper ball joint and around 50 kg fm (instead of 115!!) for the lower ball joint.

Fitting the bolt from the upper ball joint

Broken high tensile bolt

After fitting the new upper ball joint put back spring and the long thread.  The lower ball joints can be pressed in just by turning the big bolt. I also replaced all the nylock nuts and most of the bolts for high tensile ones.

Fitting the new lower ball joint Volvo Amazon
Fitting the new lower ball joint
I scored some nice unused second hand B6 BILSTEIN shock absorbers (F4-B46-0283-H0). Tighten the nuts until the rubbers of the shocks start mushroming.

BILSTEIN B6 shocks F4-B46-0283-H0 for the Volvo 122S
BILSTEIN B6 shocks for the Volvo 122S

Ready for the stabilizer and the brakes..


Jun 3, 2013

Hanging the doors

Ladies and Gentlemen: The Doors!! http://www.youtube.com/watch?v=5qRJIBtbc2c 
Fantastic music to listen to while hanging the doors of your car !

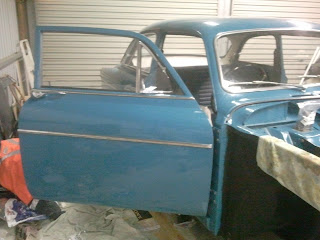
Today I started with  the doors; Fitting them back in the Volvo. Normally it's a job for two persons but when you have an engine crane or a roof in the shed with a strong beam it can easily be done alone.

Fit the rubber door seals before you fit the doors in the car. That way you won't damage the paint. I used a wooden kitchen piece and some silicone spray to fit the seals in the rails. I think because of all the primers and paint the space in the rails was a bit more narrow then original and it took me almost an hour per door to fit the rubber. Always start with the 90 degree corner, that way you can't go wrong.

Fitting the rubber door seal Volvo 122S 1969
Fitting the rubber door seal

Fitting the rubber door seal with a wooden tool Volvo 122S
Fitting the rubber door seal with a wooden tool

The window channel in the vent window was in desperate need of some new  felt
The window channel in the vent window was in desperate need of some new  felt

New felt fitted in the window channel Volvo Amazon
New felt fitted in the window channel

To protect the paint I used some foam from an old mattress overlay and a towel. Try to find the balance point of the door before you let it hang on the rope.


Door hanging  - engine crane not only for engines
Door hanging  - engine crane not only for engines. Btw, This is a good argument to convince your girlfriend  you really need an engine crane, it's multi purpose ;)

Try to hang the door hinges as close to the body bolt holes as possible. protect the body/paint with some rags before you start. Fitting the first bolt can be a bit difficult, always start with the top hinge. I also put a rag between the lower door hinge and the body when fitting the first two bolts in the top hinge, the door will move and scratch the body before you know.

Protecting the fresh paint when fitting the door

After fitting the first two bolts in the lower hinge I lowered the crane a bit in order to see if the door stayed in the same horizontal position. Then I fitted the other 4 bolts and removed the rope so the door could be closed carefully. The trick is to tighten the bolts just enough so the door won't move by it's own weight but can be moved by you. When you think it's in the right position tighten the bolts and install the lock door stop on the body. Now it's a matter of fine tuning. I also fitted the chrome trims back on the door and noticed it was impossible to get them in line with the trims on the body. I've heard that a lot of 122S were new delivered while the trims were not absolutely in line. It still looks great and gives the Volvo it's unique character.

How to hang a door - Bringing the door "back in line" Volvo 122S
Bringing the door "back in line"

Stainless steel Trims

With the door back on the car you can start with fitting all the door parts. You need to do this in a certain order ( I learned this the hard way @#$%^#* ). Start with the chrome door handle, then put back the lock mechanism, after that the inner lock operating handle with the long metal piece (don't forget to put a piece of foam between the body and the long handle). Connect them all to the actual door lock, fit the two pulleys and window handle sprocket, fit the chain/cable on the pulleys and sprocket, put some tension on the cable with the lower cable spanner, fit the inner door window channel, the vertical window channel with the stainless steel, put back the big window and connect it to the cable. Now you can install the small ventilation window, start with the rubber nose in the corner.

The next three pics were taken before the paint job but they give a nice look inside the door of a Volvo 122S

Lock mechanism inside the door of the Volvo 122S

Lower pulley window mechanism with tensioner Volvo Amazon
Lower pulley window mechanism with cable tensioner

Stuff inside a Volvo Amazon door
Stuff inside a Volvo 122S door
A look inside the door of a Volvo Amazon

Now it's a matter of fitting the door cover, the chrome handles which are secured by the small springs and the metal inner top which has to "click" in place before you can put in the 4 screws. The easiest way to to this is with a lowered window.

Door inside Volvo Amazon
One door ready

Door Volvo Amazon outside
After fitting all the door parts I had to loosen the hinge bolts a bit for the final "hanging". Luckily this 122S has only two doors...


May 29, 2013

Volvo 122S interior

The drivers seat and rear were in bad condition after 44 years; rips, brittle and sun burned spots all over. When I tried to clean the drivers seat it cracked. Time for some new upholstery.
Taking of the vinyl upholstery is an easy job, fitting the new ones is a bit more difficult. I made lots of pictures so I knew exactly how everything was held together with rings and staples.

Old back seat rest Volvo 122S blue vinyl
Old back seat rest Volvo 122S
Bottom old back seat rest Volvo 122S
Wooden bottom old back seat rest Volvo 122S

Old and new backseat rest Volvo 122S 1969
Old and new backseat rest covers Volvo 122S
When fastening the new cover always start in the middle and then work to both corners evenly. While fitting all the rings en shooting the staples I compressed the springs in the back rest by leaning on the wooden bottom with my knees.

Fitting new upholstery
The seat rest with new cover looked great without wrinkles outside the car, but when I put it back in the car it got some wrinkles at both sides. Maybe they go away after a while, maybe not.. 


The drivers seat was also in bad condition. Fitting back the new upholstery at the bottom of the rest is a bit fiddly, it's a tight fit with the metal pins. But with some borrowed kitchen tools and some @#$%!!#% you can do it...
The black metal parts were already painted with Por15 a couple of months ago.

Fitting the upholstery Volvo 122S drivers seat

Fitting the upholstery Volvo 122S drivers seat

New upholstery Volvo Amazon drivers seat

I also put in new carpet on the floors. Instead of one carpet/rug for the back, two for the front seats and one for the console I choose for 2 long pieces from the firewall till the backseat and 1 long one for the whole console. I made templates from masking paper. Always take 5mm extra when cutting the shape. I used a heat gun to make the corners fit without wrinkles. Don't come to close to the carpet otherwise it will melt. It's inavoidable to have some wrinkles, but after the carpet is glued to the floorpan you can roll most of wrinkles/bumps out with a big socket. I made the holes for the bolts with a soldering iron. It will create nice holes with melted (= stronger) edges.

New piece of carpet for the Volvo Amazon
New piece of carpet for the Volvo

Making templates for the carpet
More templates for the Volvo 122S carpets
More carpet templates

Cutting the carpet Volvo 122S
Cutting the carpet

"Fine tuning" the new Volvo Amazon carpet
"Fine tuning" the new carpet


making the console template

making holes in the Volvo carpet with a soldering iron
making holes with a soldering iron
I only glued the carpet at the rear floorpans and whole console. So if there's a leak or something in the future it's easy to check under the carpet in the front

Glue

Removing carpet wrinkles with a heat gun and a big socket
Removing wrinkles with a heat gun and a big socket

Drivers side

New carpet for the Volvo 122S

The kick boards and other cardboard panels got a new coat of paint. I used exterior acrylic wall paint. Flat off white for the rear shelf and satin black for the black panel parts.

Rear shelf / panel

Rear shelf Volvo 122S painted with exterior acrylic wall paint
Rear shelf painted with exterior acrylic wall paint


Cardboard panels Volvo 122S

Painted cardboard panels Volvo 122S

Fitting the windlace seals between headlining and body

For now I'll leave the front seats out so it's easier to work under the dash when installing the engine and doors. And I still have to clean the headlining.....