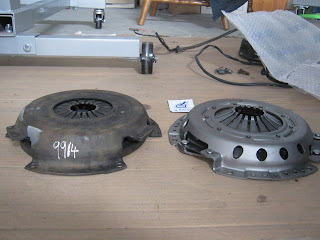
I decided to replace the whole clutch assembly because the old clutch disc and pressure plate were totally gone.
 |
| The old and new clutch disc. See the words "gearbox side" on the new one |
 |
| Old and new Sachs pressure plate, see the worn out "fingers" on the old one |
 |
| New Sachs clutch assembly, incl. new thrust bearing and spline lube |
First I had to take the engine off the engine stand. I used the engine crane, strapped the engine and stand with 3 ratchet tie downs to it and then removed the stand.
After balancing the engine I took the flywheel and bolted it on the crankshaft. The easiest way to do this is to keep a couple of mm distance between the crankshaft and the flywheel. This will make it easier to put in the bolts. Then I tightened the bolts to a torque of 54 Nm.To stop the flywheel from turning I used a bolt and and a big screwdriver as a wedge.
 |
| Tightening the flywheel bolts |
Now it was time for the pressure plate and clutch disc. First I took the spline lube that came with the clutch kit and applied some of it to the centre hole of the clutch disc. When you fit the clutch disc make sure you do it right, the Sachs set I had made it easy because it was written on both sides of the disc. Before fitting the clutch assembly don't forget to degrease the flywheel, clutch disc and pressure plate.
When the pressure plate and clutch disc were lightly bolted to the flywheel you have to line up the clutch disc with the pilot bearing in the crankshaft. The easiest way to do this is using a spare gearbox shaft but because I didn't have one I used the whole gearbox to line up.
 |
| Lining up the clutch disc and pilot bearing with the gearbox |
 |
| Lining up the clutch disc and pilot bearing - Close up |
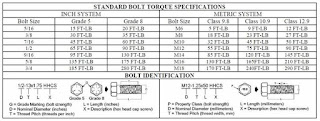
When the shaft is in the pilotbearing and clutch disc they are automatically lined up. According to the Haynes manual you have to tighten the bolts securely..... What's securely ? I found a nice table with standard torque settings which you can use when no torque setting is given in the manual.
 |
table with standard torque settings
1Ft lb = 1.356 Nm = 0.1883 kg fm = 12 lb in |
I used a torque of 24 Nm to secure the pressure plate -flywheel bolts. When the bolts were secured I took off the gearbox.
 |
| Hard to catch on a pic but the clutch disc and pilot bearing are lined up nicely |


No comments:
Post a Comment