Showing posts with label Volvo 122S B20B. Show all posts

Aug 27, 2012

Rebuilding the SU HS6 Carburetters


The double SU HS6 carburetters were covered in a mix of grease, oil and mud. As I bought the car with the engine in bits I didn't know in what condition they were and decided to clean them thoroughly, dismantle them and do some rebuilding.

SU HS6 carburetters AUD331 Volvo B20B
SU HS6 carburetters AUD331 after 13 years collecting dust
The rebuild kit you need for these SU HS6 carburetters is CRK 249. This kit doesn't come with the jet needles as they vary depending on the engine and carburetter number. The labels on the carbs indicated AUD331, so according to a needle chart I needed spring-loaded needles with code AUD1538 KN.

Rebuild kit for SU HS6 carburetters
Rebuild kit CRK 249 for SU HS6 carburetters

Needle chart SU carburettors Volvo B14 B16 B18 B20
Needle chart SU carburetters Volvo B14 B16 B18 B20
The rebuild kit came with new throttle flaps and shafts. To use them you need to ream out the old bushings and then press in the new ones which is something for a specialist. The reason to replace them is that false air can be sucked in through the space created between the shaft and the bushings after many years. I decided not to replace them to save some money. If leaking, the carbs can be easily removed to bring them to the shop for the in line reaming.
After cleaning the outside of the carbs with turps and alcohol I disassembled the first one and made pics of every step so I had some reference material when rebuilding. I think it's been the first time the inside of the carbs saw daylight in 43 years. I discovered that the needle in the second carb wasn't fit correctly.The mark/line on the needle guide should point away from the ports in the piston/air valve, so the needle leaned in the wrong direction which caused severe wear in the jet and on the needle itself.

Air valve SU HS6 carburetter Volvo B20B
Dirty Air valve SU HS6 carburetter

Air valve SU HS6 carburetter with spring-loaded needle
Air valve SU HS6 carburetter with spring-loaded needle,
note that the needle isn't installed correctly

Air valve with guide, spring and KN needle SU HS6 carburetter
Air valve with guide, spring and KN needle 

Dirty inside of the SU HS6 carburettor
Inside the SU HS6 carburettor

Old jet with needle SU HS6 carburetter
Old jet with KN needle SU HS6 carburetter,
see how the jet feed pipe fell in bits when disassembling

Replacing the spring-loaded needle and jet is pretty straight forward and will take only 15 minutes or so.
When replacing the needle make sure the needle guide is flush with the piston and that the mark on the guide points away from the ports in the piston. The jet assembly is hold by one screw and one bolt which connect the float chamber with the feed pipe. 
With most SU carburetters you need to centre the jet after replacing the needle and/or jet. But with this one it's not possible and thus not neccessary.

Spring-loaded KN needle and jet in SU HS6 AUD331 carburettor
Spring-loaded KN needle and jet close up

I also replaced the needle valve and seat in the float chamber and checked the float level (ca. 4.8 mm). 
Another thing to check is the damper piston clearance. Don't be fooled by the Haynes manual, the right clearance for the AUD331 carbs should be 0.4-0.8 mm.

float chamber SU HS6 carburettor disassembled

Old and new needle float chamber SU HS6 carburettor
Old (left) and new needle float chamber 

Messuring the float level SU HS6 carburetter

Messuring the damper piston clearance SU HS6 AUD331 carburetter
Messuring the damper piston clearance (0.4-0.8 mm)
 SU HS6 AUD331 carburetter

After reassembling the carbs they need tuning. But in order to tune them you need a running engine... Hmmm.. back in the box for now.

Rebuild SU HS6 AUD331 carburetters

Rebuild SU HS6 AUD331 carburetters
Rebuild SU HS6 AUD331 carburetters, they only need some tuning

SU HS6 carburetters mounted on manifold Volvo 122s B20B
Carburetters mounted on manifold 

SU HS6 carburetters mounted on manifold Volvo 122s B20B
Carburetters mounted on inlet/outlet manifold 

SU HS6 carburetters mounted on manifold Volvo 122s B20B

SU HS6 carburetters mounted on manifold Volvo 122s B20B


Aug 13, 2012

Assembling the engine Volvo B20B - Pistons

When I bought the car it came with new Mahle pistons (0.030") and luckily the new piston rings were already fitted. The pistons were also assembled to the rusty connecting rods. In order to clean and balance the rods I took the pistons off again. The rods were then balanced together with the crankshaft and flywheel. This was 2 months ago..

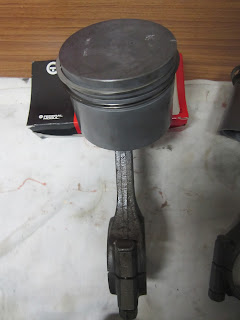
New Volvo 122S B20B Mahle piston 0.030" with rusty rod

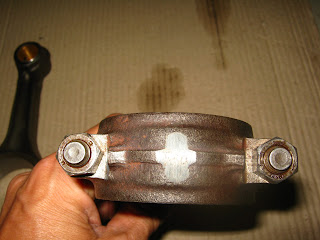
Balanced connecting rod - cap

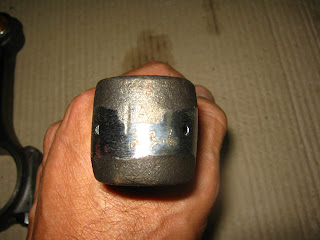
Balanced connecting rod - top

Easy...not! It was somehow really hard to get the gudgeon out of the pistons again and the rod cap bolts were impossible. But after some @#$%#@**!% and WD40 I managed to take it in bits :-).

Gudgeons out , bolts still tight which I didn't realised when taking the picture
I thought everything was ready for the assembling...

When assembling the pistons to the rods with the gudgeon pins it very important to do it the right way.


  • On top of the piston you can see a mark; this mark should face to the front of the engine
  • On top of the pistons there's also a number (1, 2, 3 or 4); this number should correspondent with the cylinder bore number. Number 1 is the cylinder bore at the front of the engine
  • On the rods and their caps you can find the same numbers for the same purpose
  • When connecting the rod with the piston make sure the rod marking numbers face away from the camshaft side when installed in the engine.

On top of the piston you can see a mark this should face to the front of the engine
You can also see a number (no. 2 for this one)

Numbers/marks on the rods and the rod caps

When connecting the rod with the piston make sure the rod marking numbers face away from the camshaft side when installed in the engine
Thre right way to connect the rod to the piston, see the marks/numbers on both

Pistons assembled to the rods with the gudgeon pins

Some Maths
I was curious what the new engine capacity should be with the 0.030" Mahle pistons.
The formula to calculate the capacity of an engine:

Capacity (in cc)  =  (π/4 x bore² x stroke x # cylinders)/1000   (note: π ≈ 3.14)
Original engine: (3.14/4 x 88.9² x 80.0 x 4)/1000  ≈  1986 cc
Rebuild engine with 0.030" (0.762 mm) Mahle pistons:
 (3.14/4 x 89.66² x 80.0 x 4)/1000  ≈  2020 cc
An increase of 34 cc !