May 29, 2013

Volvo 122S interior

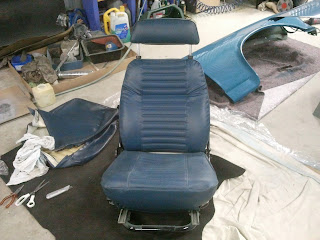
The drivers seat and rear were in bad condition after 44 years; rips, brittle and sun burned spots all over. When I tried to clean the drivers seat it cracked. Time for some new upholstery.
Taking of the vinyl upholstery is an easy job, fitting the new ones is a bit more difficult. I made lots of pictures so I knew exactly how everything was held together with rings and staples.
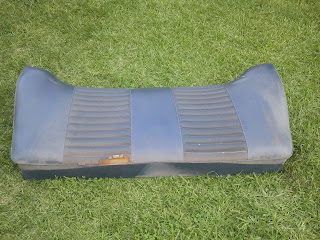
Old back seat rest Volvo 122S blue vinyl
Old back seat rest Volvo 122S
Bottom old back seat rest Volvo 122S
Wooden bottom old back seat rest Volvo 122S

Old and new backseat rest Volvo 122S 1969
Old and new backseat rest covers Volvo 122S
When fastening the new cover always start in the middle and then work to both corners evenly. While fitting all the rings en shooting the staples I compressed the springs in the back rest by leaning on the wooden bottom with my knees.

Fitting new upholstery
The seat rest with new cover looked great without wrinkles outside the car, but when I put it back in the car it got some wrinkles at both sides. Maybe they go away after a while, maybe not.. 


The drivers seat was also in bad condition. Fitting back the new upholstery at the bottom of the rest is a bit fiddly, it's a tight fit with the metal pins. But with some borrowed kitchen tools and some @#$%!!#% you can do it...
The black metal parts were already painted with Por15 a couple of months ago.

Fitting the upholstery Volvo 122S drivers seat

Fitting the upholstery Volvo 122S drivers seat

New upholstery Volvo Amazon drivers seat

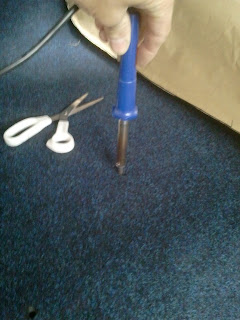
I also put in new carpet on the floors. Instead of one carpet/rug for the back, two for the front seats and one for the console I choose for 2 long pieces from the firewall till the backseat and 1 long one for the whole console. I made templates from masking paper. Always take 5mm extra when cutting the shape. I used a heat gun to make the corners fit without wrinkles. Don't come to close to the carpet otherwise it will melt. It's inavoidable to have some wrinkles, but after the carpet is glued to the floorpan you can roll most of wrinkles/bumps out with a big socket. I made the holes for the bolts with a soldering iron. It will create nice holes with melted (= stronger) edges.

New piece of carpet for the Volvo Amazon
New piece of carpet for the Volvo

Making templates for the carpet
More templates for the Volvo 122S carpets
More carpet templates

Cutting the carpet Volvo 122S
Cutting the carpet

"Fine tuning" the new Volvo Amazon carpet
"Fine tuning" the new carpet


making the console template

making holes in the Volvo carpet with a soldering iron
making holes with a soldering iron
I only glued the carpet at the rear floorpans and whole console. So if there's a leak or something in the future it's easy to check under the carpet in the front

Glue

Removing carpet wrinkles with a heat gun and a big socket
Removing wrinkles with a heat gun and a big socket

Drivers side

New carpet for the Volvo 122S

The kick boards and other cardboard panels got a new coat of paint. I used exterior acrylic wall paint. Flat off white for the rear shelf and satin black for the black panel parts.

Rear shelf / panel

Rear shelf Volvo 122S painted with exterior acrylic wall paint
Rear shelf painted with exterior acrylic wall paint


Cardboard panels Volvo 122S

Painted cardboard panels Volvo 122S

Fitting the windlace seals between headlining and body

For now I'll leave the front seats out so it's easier to work under the dash when installing the engine and doors. And I still have to clean the headlining.....

May 12, 2013

Fitting the windows in the Volvo 122S

Fitting the windshield and rear window is a job for 2 people. You can do it alone but it's way harder.
So on a sunny Saturday morning Myk rocked up to help. First we cleaned the windows and checked which way around the rubber seals had to go.
If you take a closer look at the rubber seals you'll see one slot on the inside that goes over the body flange, one slot on the outside for the window and finally one slot on the outside for the chrome/alu trim.
The rear window was still the original one and is made of toughend glass which is stronger than the front window that was once replaced for a laminated one. We started with fitting the new rubber seal around the rear window.  Because the rear window has strong curves it was hard to keep the rubber in place so we used some masking tape. 


Fitting the rubber seal around the rear window of the Volvo Amazon
Fitting the rubber seal around the rear window

After the seal was finally in place around the window we applied Sikaflex 227 sealant between the window and the rubber seal. When fitting the window with rubber in the window frame the lip on the inside of the seal has to fall over the window flange, this is a very fiddly job but luckily there's a nice trick that will make the job a lot easier. Just take a nylon cord/washing line and put this in the slot all the way round. Leave the two ends hanging out at the center of the bottom of the window. Lift the windscreen in position and while one person is holding the window in place the other person is inside the car and is slowly pulling the string out which will pull the rubber lip over the flange. Work evenly on both sides, around 10-15 cm at a time. When the window bottom is seated the outsider can move the window so it's right in the middle of the window frame. The corners are a bit harder and you have to be really careful not to cut the rubber seal with the string. We used some thinned dishing soap to make it a bit easier. 10 minutes later the rear window was in place. 

Rear window Volvo Amazon fitted with a the help of a washing line
Rear window Volvo 122S fitted with the help of a washing line

To make sure it's water tight I laid a bead of sealant between the body and rubber seal the next day. I used some masking tape to keep the body clean and scratch free.


Masking tape to keep the body clean and scratch free

Putting Sikaflex 227 sealant between the body and rubber window seal

The front windshield was even easier to fit because it's not as round as the rear window.


Fitted windshield  with new rubber seal Volvo Amazon
Fitted windshield  with new rubber seal Volvo 122S

Fitting the side window is a bit different. I also used a string to pull the lip over the window flange. But this time I started by holding the rigid rubber seal (there's some kind of metal frame inside the rubber) on the inside of the car and pulled the string towards me while standing on the outside. 

Rigid seal side window Volvo Amazon
Rigid seal rear side window Volvo 122S

Fitting a string in the slot of the rubber window seal Volvo Amazon
Fitting a string in the slot of the window seal

Fitting seal rear side window Volvo 122S
Moving the seal in the right position

Using the trick with the washing line

Seal back in place
Seal back in place
When the rubber seal is in place it will take only a couple of minutes to put back the window with the 4 bolts and 2 screws.

Rear side window fitted - Volvo Amazon 1969
Window fitted
Done. Next thing to do is fitting the trim in the rubber seal around the windows...