Feb 15, 2014

Replacing the rear wheel bearings

When I took the Amazon for a testdrive  I heard a whoop-whoop-whoop sound coming from the rear axle. The sound is hard to describe but it's a bit like driving over white stripes on the road all the time.
The noise was stronger when I turned right and it was almost gone when I turned left.
Yep...a worn out left wheel bearing. Left because the car puts more weight on the left side when turning right.

I decided to replace the rear wheel bearings on both sides. The name wheel bearing is a bit misleading because the bearing is not somewhere in the wheel but inside the rear axle. When replacing the wheel bearings it's smart to replace the oil seals,gaskets and retainers with the felt seals as well.

Rear wheel bearing set with axle shims Volvo Amazon
Complete set for one side

New Timken rear wheel bearing Volvo Amazon
New Timken rear wheel bearing

I started with the left side because that's the side without the shims. Shims are the thin metal plates (see right on above pic) in various sizes. They are placed between the backing plate and the axle in order to create some play between the axle and the bearings. The shims on the right side determine the play for both sides. If there's not enough play the new bearing will worn out in no time, it can even cause the half shaft to brake. To much play will also ruin the bearings. First I had to remove the drum brake, brake shoes assembly, hand brake cable and brake cylinder. After removing the cylinder from the backing plate I fitted the cylinder back on the brake line in order to stop the leaking of more brake fluid.
Now you have to remove the 4 nuts holding the retainer with felt seal, the two gaskets and the thick metal plate between the gaskets and of course the big black brake backing plate..

brake backing plate and retainer with felt seal Volvo 122S
brake backing plate with old gasket, retainer with felt seal and metal plate with other gasket

Now you can remove the left side half shaft. Well...it's not that easy, according to the Haynes manual you need a special tool to press it out. The outer race is pressed in the hollow axle and will give you a hard time.

Half shaft with rear wheel bearing Volvo Amazon
Half shaft with rear wheel bearing Volvo 122S

But as always there's a nice little trick to get this thing out. I put back on the drum brake and gave the big nut a couple of turns. Now get under the car and hammer (not too hard) on a piece of wood held against the drum. Do this on the left, right, top en bottom side of the drum and after a while it will come loose. You can use the drum as a nice handle to pull the half shaft out of the axle housing.


Drum used as a handle to get the half shaft out of the axle
Drum used as a "special tool"  to get the half shaft out of the axle housing

Half shaft coming out of the rear axle of the Volvo 122S
Half shaft coming out of the rear axle housing of the Volvo 122S

Removing the woodruff Volvo Amazon
Removing the woodruff

Inner and outer half of the rear wheel bearing still on the half shaft Volvo 122S
Inner and outer half of the rear wheel race still on the half shaft

Remove the half shaft wood ruff and carefully tap off the inner half of the wheel bearing.

Half shaft with inner and outer race of the wheel bearing Volvo 122S
Half shaft with inner and outer race of the wheel bearing 

When I took a closer look at the outer race of the old wheel bearing I could see why it made such a noise; half of the inside was damaged. There was almost no grease left  in the bearing.


Another thing was that the outer race was from Bower (USA) and the inner race of the wheel bearing was from SKF (Sweden). Apparently they can be combined because I found the same on the right side and that bearing was still in good order.

Old Bower outer race of the wheel bearing Volvo Amazon
Old Bower outer race of the wheel bearing

Old SKF inner race of the wheel bearing Volvo Amazon
Old SKF inner race of the wheel bearing

Next thing to do is removing the oil seal inside the hollow axle. And again you need a special tool... This time I used a water pump plier. You'll damage the old oil seal but that doesn't matter as long as you don't damage the inside of the rear axle housing, so be care full again.


Old oil seal inside the rear axle Volvo 122S
Taking out the old oil seal rear axle Volvo Amazon
Taking out the old oil seal

Old oil seal rear axle removed Volvo Amazon

Parts of the old oil seal and also the new rear axle oil seal Volvo 122S
Parts of the old oil seal and also the new oil seal

I used a 36mm socket and a bit of thin oil to tap the new oil seal back in place. (Before installing the new oil seal make sure everything inside the outer axle housing is really clean). Now carefully tap the new inner wheel bearing on the half shaft and slide it back in the axle. be careful not to damage the new oil seal and the diff. Fill the bearing with lithium grease or some other high temp resistant grease and carefully put back the new outer bearing. Carefully because it's a bit difficult to get it nice and even in the hollow axle. I pushed the first mm in and used the old retainer plate and the 4 nuts to drive it in evenly till it was almost flush with the axle.

36 mm socket to tap in the new oil seal rear axle Volvo 122S
36 mm socket to tap in the new oil seal


New oil seal rear axle back in place Volvo 122S
New oil seal rear axle back in place

Castrol Wheel bearing grease rear axle
Castrol Wheel bearing grease

Inner rear wheel bearing back in place and filled with grease Volvo Amazon
Inner rear wheel race back in place and filled with grease


Outer race half way in Spicer 3010 axle housing Volvo Amazon
Outer race half way in Spicer 3010 axle housing

Using the retainer to press the outer wheel bearing back in place Volvo 122S
Using the retainer to press the outer wheel bearing back in place

Rear wheel bearing back in place Volvo Amazon
Rear wheel bearing back in place Volvo 122S
As we can only adjust the play on the right hand side that's all for the left side for now. I fitted back on the brake backing plate, brake cylinder and hand brake cable mounting and moved on to the right side.

After removing all the brake parts I could take off the brake backing plate and have a look at the shims between the backing plate and the end of the axle housing.

Shims on the Spicer rear axle Volvo Amazon
Shims on the right side of the Spicer rear axle
When the new wheel bearing was back in place I installed the same shims and a really thin third shim.
Then I tried to measure the play of the half shaft with a dial indicator. According to the manual it should be between 0.07 and 0.20 mm. Well, I tried but I couldn't get an accurate reading because the end of the shaft isn't that smooth so even with the slightest turn you get an incorrect reading on your dial indicator.

Measuring the Spicer rear axle play with a dial indicator Volvo Amazon
Measuring the rear axle play with a dial indicator

I couldn't feel any play so I decided to leave it like the first set up and after fitting back all the brake parts , wheels and bleeding the brakes I took the Amazon for a test drive... All good.

Oct 16, 2013

Bleeding the brakes

It has been a while since I fitted the new brake lines. After fixing the rear drum brakes I could finally fill the braking system with fresh DOT4 brake fluid. When fitting new brake lines you tighten them ca. 1/8 -1/4 turn after feeling resistance. But you'll never know if it's tight enough until you fill the system with new brake fluid.

Brake line connections

Normally 200-300 cc brake fluid is enough to fill an average car brake system. But because this is about filling an empty system you also have to get rid of the air by bleeding and I needed around 600-800 cc to get the job done.

So filled the system through the brake fluid reservoir and started checking all the brake line connections. I counted 32 connections on this duel brake system. 2 of them were leaking right away but with a 1/8 extra turn the leaking stopped.

I jacked the car a bit higher at the rear hoping that most of the air in the system would go there.

The Volvo 122S with the dual line system has 8 bleed valves; each front caliper has 3 valves and each rear wheel one (just above where the brake line goes into the brake/wheel cylinder).

3 bleed valves front brake calipers Volvo 122S
3 bleed valves (covered with rubber caps) for the front brake calipers

The brake bleeding sequence for the Volvo 122S dual line system:

  1.  Left rear wheel
  2. Left front wheel, upper, inner
  3. Right front wheel, upper, inner
  4. Right rear wheel
  5. Right front wheel, outer
  6. Right front wheel, lower, inner
  7. Left front wheel, outer
  8. Left front wheel, lower, inner
Normally you need 2 people to bleed the brakes; one pumping the brake pedal and the other opening and closing the bleed valves. But with some simple self made tools you can do it alone.

You need two "tools" to make brake bleeding easy.
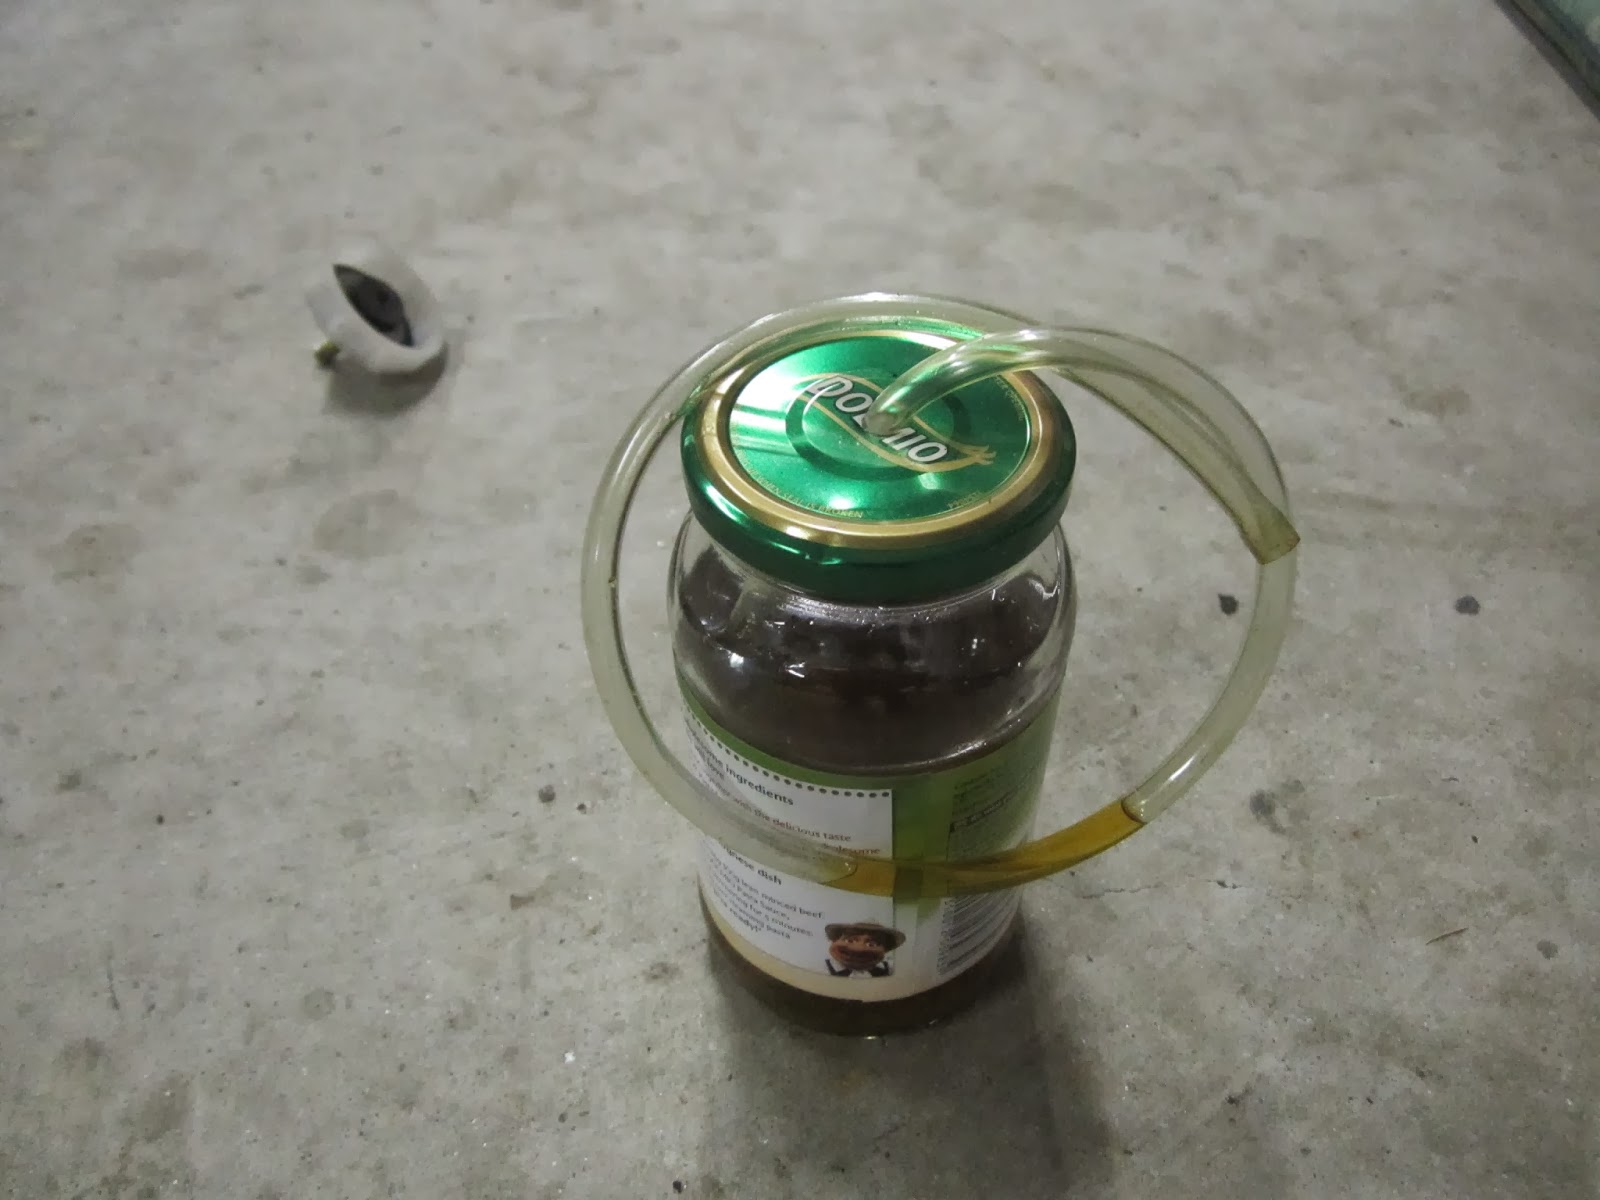
The first one is a cap with a valve for your brake fluid reservoir and the second one is a clear hose with a small valve at the end hanging in a jar filled with brake fluid. 

Brake bleeding tool
2 Brake bleeding tools

I bought a $4,- dollar spare cap, drilled a hole in it and tapped in an old bike valve tube. I used some Teflon tape an two o-rings to make it air tight. I screwed it on the reservoir and now I could put pressure on the brake system with a simple hand pump. Not to much, 3-4 pumps are enough. 

Brake fluid reservoir cap with "pressure" valve

Modified cap on brake fluid reservoir

When you open a bleed valve you want the air going out, not air going in! So you need a clear plastic tube that fits the bleed valve, push a bicycle tube valve in the other end (top of the valve in the tube!) and let it hang in a glass jar filled with fresh brake fluid. The valve will let the old brake fluid and air going out but prevents air from going in when the pressure in the system isn't high enough.

Brake bleeding tool - bicycle valve in clear tube
bicycle valve in bottom of clear tube

When I put some pressure on the braking system more the half of the connections started sweating, so I fixed this first (1/8 -1/4 turn extra) before bleeding the system. 

The tools did their job and after bleeding all the valves twice I'm pretty sure there's now only brake fluid in the system. Don't forget to check the level in the brake fluid reservoir while bleeding and top up when neccessary. Btw I took all the wheels of which will make the bleeding a lot easier.

Bleeding the dual brake system

While the car was still jacked I tested the brakes by turning the wheels as fast as possible by hand and then hit the brake pedal, all good.

The next test was driving the car on the driveway and hitting the brakes, very exiting .. the driveway was ca 35 m long and with the shed open I had an extra 10 m. The first time I drove really, really slow and hit the brakes, they worked! So this time I took of fast,put in in second gear and with a speed of ca 15 mph I hit the brakes again, it stopped again!

I could also feel the assistance of the brake servo so that one functioned too. Now it was time to check the unions and connections in the brake system again, ^#%#@$ half of them were sweating! Well it wasn't a real problem just some extra work tightening them and bleeding the system one more time just to make sure... 

Oct 13, 2013

Fixing the rear wheel drum brakes

The Volvo 122S  rear wheel brakes are of the drum type. In order to remove the drums you need a special drum brake puller. And because I didn't had this special puller I postponed this job for months. Finally I decided to buy one of those pretty expensive pullers and last weekend the brakes saw daylight after decades of darkness...

Original Volvo 122S drum brake puller

Don't try to use universal pullers because you will certainly damage the brakes.
Instead of most universal pullers this original one has a big bolt with a flat end. Most other pullers have a center point end which can easily damage the drive shaft. I used a special hammer spanner to loosen the drums. After hammering the spanner a couple of times the drum came loose with a big bang.

Volvo 122S rear drum brake

Volvo Drum brake puller with 32mm hammer spanner

Finally the drum came loose

Inside the Volvo Amazon's right drum brake
Inside the right drum brake

 As you can see in the pic above the brake shoes in the right drum were upside down. The lining of the brake shoe at the end should start on top of the shoe. If the shoes are fitted the wrong way round the handbrake won't work correctly.

New Volvo Amazon drum brake shoes
New drum brake shoes

The latest model Volvo 122S has self adjusting drum brakes. Every time you pull the handbrake the brakes will be adjusted. Unfortunately this system isn't very reliable so it's a good idea to check 'm every now and then. They can also be adjusted by hand just by putting a screwdriver into the little hole in the drum and turn the adjuster screw a couple of notches.

After taking all the old parts out I gave the brakes a good clean and took off the sharp edge of the lining before putting in the new brake shoes.

Taking off the sharp edge of the brake lining with a grinder
Grinding off the sharp edge of the brake lining

Shaved lining brake shoe
I also replaced the wheel cylinders and brake hoses, they aren't too expensive and I was pretty sure the old wheel cylinders wound't work after doing nothing for more than 15 years. The flexible hoses can be very tricky because the look good on the outside but after many years they are swelling on the inside en thus are often blocked. Don't forget the copper ring between the brake hose and the brake valve

Old flexible brake lining removed

Fitting the new brake hoses
Fitting the new brake hoses with copper ring

Left drum brake Volvo 122S with new parts
Make sure the big bolts are fully tightened. I used the 32 mm hammer spanner to tighten them.


Right drum brake Volvo 122S with new parts
Drum brake ready for the wheel

Time for fresh brake fluid and bleeding the brakes.

Aug 28, 2013

Flooding SU carburetors

When the B20B engine was idling for a couple of minutes the SU carburettors always began to flood. I played with the floater height, replaced the floater needles, put back in the old ones, took the carbies off..... Nothing really helped. The only result was that I now can rebuild and tune SU HS6 carbies with my eyes closed.

And as the SU HS6 carburettors are mounted just above the exhaust  flooding can be dangerous too!

It must be something else, something outside the carbs....
Well, I fitted a new aftermarket mechanic fuel pump in the car and I've heard that new fuel pumps often gave a higher than desired pressure. And another thing was I fitted a new camshaft with a fresh "eccentric lob" what would cause an even higher pressure (caused by a longer stroke).

Mechanism Mechanic Fuel lift pump

After market Fuel pump Volvo 122S

There are three solutions to solve this; one is to fit an extra or extra thick gasket between the fuel pump and the engine (shorter stroke > less ml fuel/stroke) and number two is to place a Fuel Pressure Regulator (FPR) between the fuel pump and the SU carburetors. Three is to buy an original fuel pump (I'll keep that one in mind if I ever need a new fuel pump..)

A twin SU HS6 carburetor can handle a pressure of ca. 2.5 - 3.0 psi.
To measure the pressure you need to disconnect the fuel line from the carbies and put the adapter from the gauge in the fuel line. The fuel in float bowls will keep the engine running long enough to measure the pressure. It was 4 psi while the engine was idling!

Measuring the fuel pressure Volvo Amazon
Measuring the fuel pressure
After installing the adjustable Fuel Pressure Regulator I set it on 2.5 psi. No more flooding! As the car is still in the shed I don't know if 2.5 psi is enough while driving it so maybe I've to set it on 3 psi.

Fuel Pressure Regulator / FPR in the Volvo 122S
Fuel Pressure Regulator in the Volvo 122S

 Btw the Fuel pressure gauge can also be used to measure the vacuum of your inlet manifold. This should be around 18-21 with an idling engine (no matter what engine). Of course I couldn't resist this opportunity... All good!

Measuring the inlet manifold vacuum
Measuring the inlet manifold vacuum 

Aug 27, 2013

Radio and new Dashboard for the Volvo

The radio that was in the Volvo 122S since 1970 wasn't working too well. So I decided to put in a nice new one. BTW they call it a Media Player instead of Radio nowadays... whatever...
I did like the looks of the old school radio so I only disconnected it and left it in the metal dashboard.
After some desktop research I found a nice Radio for just under $100,- with Blue tooth and, very important, remote control.  It's a Sony DSX-A50BT (if you wanna know :0)

Now I had to find a good "out of sight" place for the new Radio and speakers. The glove shelf is mounted on the firewall with two screws, and even better the distance between the screws is almost ideal for the new Radio. Now you probably also understand why I needed a radio with remote control...

Radio mounted with brackets in Volvo 122S

I bought 4x 20 cm long metal brackets with holes. The brackets were easy to bent but strong enough to keep the radio and front speakers  in place. The distance between the holes in the brackets was the same as the mounting holes in the radio so that part was easy.

The old antenna was still in good condition but as I didn't want to drill another hole in the fender I found a nice spot under the dash and mounted it with two tie rips.

External Antenna hidden behind dashboard Volvo Amazon
External Antenna hidden behind dashboard Volvo 122S
Two 220W 4-way Pioneer speakers were used as front speakers. No particular reason for Pioneers, I just found them new in a box in a Saab 900 wreck (but that's another story).
As I didn't want to drill more holes in the body I took longer top bolts for the bonnet mounting, made the holes in the brackets a bit bigger and bolted them on the inside thread of the longer bonnet bolts.

Speakers mounted on longer bonnet bolts Volvo Amazon
Speakers mounted on longer top bonnet bolts Volvo 122S

Speakers mounted on longer bonnet bolts Volvo 122S
Right speaker mounted with brackets on longer bonnet bolts

Left speaker and Radio hidden under dashboard Volvo Amazon
Left speaker and Radio hidden under dashboard 

 Can you remember the old original dash pad? After more than 40 years in the harsh Australian sun it was cracked, shrunk and totally useless. I tried to repair it but it was too deteriorated. Buying a new original one seemed like trowing money in the well known pit. Then I found a good solution; a polyester replica of the original dash pad. Looks exactly the same as the original and won't crack or shrink in the hot sun.


Old cracked dash pad Volvo 122S
Old dash pad Volvo 122S

Old cracked dash pad Volvo Amazon
Cracked...

Old dashboard Volvo Amazon
....

New polyester dash pad Volvo 122S

It was a bit fiddly to fit the polyester dash pad. You have to drill the holes in the dash pad yourself. This is because not every 122S has the pre-drilled mounting holes in the metal part of the dashboard in the same spots. So it's a lot of measuring (and a bit of bending) but after a couple of hours I was happy with the results.


New polyester dash pad Volvo 122S

New polyester dash pad Volvo 122S
New dashboard Volvo 122S