Cleaning the windshield and rear window
The front- and rear window came out with an edge covered with old hard black sealant. I tried to get rid of it with thinner, sharp knives, aceton, etc, nothing worked.
Then I remembered I still had some paint stripper left which I used on the body of the Volvo 122S. It's a gel, so it's easy to apply. I tried it on a little part, waited for 10-15 minutes and took a blunt scraper.
It worked! The sealant had turned into black butter and I could almost wipe it of with a rag. Watch out with the edge of your windshield, especially when the edge is a bit crumbly, because the paintstripper may get between the different layers of the glass. When all the sealant was removed I hosed the windows down with water to get rid of the paint stripper.
 |
| Windshield Volvo 122S with a lot of hard old black sealant |
 |
| Paint stripper gel on top of the old hard sealant |
 |
| Windshield and rear window finally nice and smooth |
The tail lights looked a bit dull and rusty so I took 'm apart. I cleaned all the parts with hot water and a brush. The rust on the chrome bezels wasn't from the bezels but from the rusty screws. I'm gonna replace them with Stainless steel ones later.
 |
| Tail light with bezel |
The chrome on the inside of the tail lights was dull or totally gone. Two coats with chrome spray made them look like new. Don't use clear on top of the chrome paint because it will make it look darker and greyish.
 |
| Painting the chromed inside of the tail lights. Right one with a coat of clear on top which I resprayed later |
 |
| Resprayed inside of the tail lights |
 |
| Tail light with bezel Volvo 122S |
Wipers
Before putting back the wiper assembly I wanted to make sure that everything was working like it should be. With some inernet research and tips from my Volvo friends I tested everything on the work bench.
 |
| Wiper switch Volvo 122S - see the four different modes |
On the other side of the switch you'll find 5 pins.
 |
| Wiper switch Volvo 122S with 5 pins |
If you take a closer look you'll see a letter next to each pin/connector :
P = green (wiper motor) and + lead from fuse box to pos. pole battery (I tested without the fuse box : o )
A = black (wiper motor)
F = red (wiper motor)
W = black (washer motor) (I used a brown lead in the test)
Wiper motor housing and other pin on washer motor are connected to the neg. pole of the battery.
 |
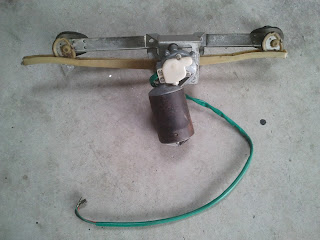
| Wiper motor Electrolux - Volvo 122S 1969 |
 |
| Testing the wiper assembly |
Everything worked (..of course, it's Volvo..;)
If you want more info about the different Volvo wipers, check http://www.sw-em.com/Windshield%20Wiper%20Systems.htm with lots of detailed info

Really enjoying your posts on your 122. Just outside San Francisco and have had 3 Amazons now... Working on a '68 122 wagon at the moment. Bookmarking the page! Keep it up! -Dan
ReplyDeleteThanks Dan, good luck with your Wagon!
DeleteYou will find more custom fresh paint options to select from including pear offers, metallic offers and fluorescent vehicle offers, nevertheless the only factor that you ought to be worried about is to find the right combination that can make your vehicle look wonderful according to your opinion. Obviously, that's the only goal over time!
ReplyDelete