Jul 19, 2012

Replacing the B20B Valve seats

Last week the outlet valve seats were replaced by new hardened ones. If you want to use lead free petrol or LPG you need harder valve seats than the original  valve seats who are directly cut into the edge of the valve port of the cast-iron Volvo B20B cylinder head.

And while the engine was still disassembled I brought the cylinder head to Chris Milton Engines
Sam took some pictures of the whole process.

Replacing outlet valve seats Volvo 122s B20B engine
Cylinder head Volvo B20B

Replacing outlet valve seats Volvo 122s B20B engine
Cylinder head and new exhaust valve seat


Replacing outlet valve seats Volvo 122s B20B engine
Removing the old valve seat

Replacing outlet valve seats Volvo 122s B20B engine
New uncut valve seat in place


Replacing outlet valve seats Volvo 122s B20B engine
Cutting valve seat 

Replacing outlet valve seats Volvo 122s B20B engine
Cutting valve seat

Replacing outlet valve seats Volvo 122s B20B engine
Valve seat cutted

Replacing outlet valve seats Volvo 122s B20B engine
Refined shape of outlet port with new hard valve seat

Replacing outlet valve seats Volvo 122s B20B engine
Ready
Sam also did a vacuum test on the inlet valves; all good. Normally there´s no need to replace the inlet valves because they get less hot then the outlet valves.


Jul 14, 2012

Painting experiment


Time for some painting!
Because I'm still waiting for engine parts I decided to kill time with some experimental painting on the Volvo body.
The Volvo122S  really needs a paint job. The original paint has faded, is cracked and on the hood and roof it's even flaking. On some spots you can see the bare metal and there's a lot of surface rust.
Because I didn't know what should be the best way to get rid of the old paint I tried several things. I used the right front panel as my test panel.

Original paint on the hood
Original paint on the hood, a lot of surface rust...

  • A wire brush on the drill - to slow 
  • A grit 80 sanding disc with the angle grinder - to aggressive but you can use it for areas with surface rust
  • Chemical with paint stripper - is OK but not as fast as I taught it would be
  • Finally I got the fender back to bare metal with a combination of paint stripper and the wire brush drill
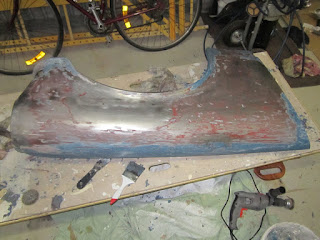
Almost bare metal Volvo 122S fender

Next step was to prime the fender. I tried rolling on Dupont 2K high solids primer (1040R). This primer is suitable as an enamel undercoat/primer (who cares??... well.. read on ;) ) It's very smooth to roll but you'll  get more orange peel than with spraying. So I sanded it back and applied a second and third coat with a simple 1.8 mm spray gun, much better. When I'm gonna prime the whole car I'll use a Dupont surfacer under the primer but for now this will do.
The next day I sanded the primer with 240, 360 (dry) and 400 (wet) grit.

After 3 coats of Dupont 1040R primer
After 3 coats of Dupont 1040R primer, before sanding

Now it was time for some painting. I got some quotes for spray painting... 8000-10.000 dollar for a real good job, (including engine bay, boot and interior) and still 4000-5000 for a quick job. Hmmm... what are the other possibilities...

I started searching the Internet and read a lot about painting your car with.... a roller...
Well, as I was still experimenting with the fender I bought some paint at Bunnings. I chose White Knight Epoxy enamel because that was the only paint that could be custom colour mixed. The mixed colour wasn't an exact match with the original blue (Volvo 99) colour but good enough for the experiment. I mixed the paint with 25% Penetrol and 20% turps. It rolled on pretty smooth but there was way to much orange peel. I also discovered that this paint wasn't UV stable. Time for a different brand.

International  Toplac.
This is original oil based yacht paint, high gloss, durable and UV-resistant. The only problem was that this paint only comes in ca 12 colours. As I wanted an exact match with the original Mediterranean blue colour I bought 3 different colours of Interlux Toplac and started mixing them (Oxford blue, Squall blue en Donegal green). I used a glass jar and 5 25 ml syringes and wrote down how much I used from each colour.I worked in 1 ml steps at a time. After an hour or so I found the exact match fort the 100% paint mix. But.. what's the ORIGINAL colour...The Volvo came with the radio cover wrapped in a newspaper from December 5 1970, so that's the real non faded colour.
Then I added 25% Penetrol and 25% Mineral turps. The colour changed a little bit,  but still very very close to the original 99 colour.

Radio cover Volvo 122S 1969 - Original paint and colour

Ingredients for the Toplac paint mix
Ingredients and tools for the Toplac paint mix

Roll it on.
To apply the paint I used a 10 cm foam roller with a round top. To keep the paint tray clean just put in a new piece of aluminium foil after each coat. The trick is to keep the coats as thin as possible, so squeeze out the roller before it hits the body.  It was obvious that the Toplac is a much better paint which flows better, has more gloss and less orange peel.
According to several stories on Internet it takes between 6 and 10 coats to get a good result. And sanding between each or second coat is also necessary. I sanded the previous coat with 400 (because it had a lot of orange peel from the White knight paint) and then 800(wet) . Now waiting for the results, will the colour be the same when it's dry...
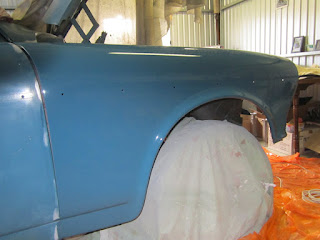

First coat of Toplac mix (underground was already blue)
First coat of Toplac mix (underground was already blue from the previousWhite Knight experiment)
 now waiting for the results...
Update 15-7:

It's looking good both the colour match and the quality, almost no orange peel. I just sanded it back with 800 wet and applied the next coat.

Jun 17, 2012

Painting the heater and other parts Volvo 122S

This weekend it was time for some more painting. I started with the heater.  The old black paint was flaking and there was surface rust. Taking the heater apart is pretty straight forward.

Heater Volvo 122S engine bay
Heater in engine bay

Heater Volvo 122S interior before painting
Heater interior

Taking the heater apart - Volvo 122S
Splitting the heater

Heater parts and parcel shelf bare metal Volvo 122S
It took quite some time to strip the paint ..

Heater parts just before painting - Volvo 122S
Ready for painting

Painted heater parts - Volvo 122S
After 3 coats

For the black parts I used engine paint  (2x black 400ml VHT rattle cans ) because it's stronger than normal enamel and after baking also chemical and heat resistant. After painting and baking I treated the seams and corners on the inside with Penetrol. 

The parcel shelf was also painted with engine paint.

Painted engine parts B20B - Volvo 122S
Some other painted engine parts 

For the silver parts and yellow fan I used VHT caliper paint; It can withstand high temperatures, is chemical resistant and, more important, the  colour is close to the original. Finally Because the caliper paint itself isn't really glossy after 3 coats of caliper paint I hit the parts with 2 coats of clear gloss.

Paint rattle cans - Volvo 122S


Heater blower motor late version - Volvo 122S 1969
The Heater blower motor needed some help to turn after 12 years.
I loosen the little bolts on top and sprayed wd40 on the axle.
After that it worked like new.

Heater core - Volvo 122S 1969
The core was in good condition, it only needed some flushing with water


Jun 3, 2012

Painting Volvo B20 Engine

This weekend I finally painted the engine.
I started masking the engine block and cylinder head. It took me almost 6 hours to get them ready for the paint job...

Before and after masking I cleaned everything thoroughly with acetone.
The acetone also ate my "chemical resistant" rubber gloves from Bunnings, strong stuff......

I used an old masking trick invented by old school gasket makers;  First apply the masking tape and then hit the edge of the masked area softly with a hammer, this ensures razor sharp masking edges.
For the spark plug holes I used washers wrapped in a piece of masking tape, filled the little bolt holes with aluminium foil and ear plugs and used carton and toilet rolls for the expansion plugs openings.

I applied 3 coats within one hour, two light coats and a thicker wet top coat.


Painting Volvo B20B engine
VHT Engine enamel, acetone, masking tape and a hammer will do the job

Volvo B20 engine masked
Engine block masked and cleaned with acetone

Volvo B20 engine painted
B20 just after the third wet coat

Volvo B20 engine cylinder head painted
Cylinder head with 3 coats

Volvo B20 engine painted
Masking tape removed

Volvo B20 cylinder head painted

Volvo B20B engine painted

Volvo B20B cylinder head painted

Volvo B20B engine painted


When the paint was completely dry I baked the parts at 93°C for 60 minutes. Sometimes a big oven can be pretty handy..I really like the smell of fresh engine paint in the kitchen ;)

B20 Oil sump baking at 93C in kitchen oven
My Kitchen Rules

B20B Cylinder head baking at 93C in kitchen oven
Smells good


Baking the Volvo B20B engine with new paint
I used a heater to "bake" the engine block, it was too big and heavy,
even for my big kitchen oven.

Next job will be painting the black and silver engine parts and get rid of the red dust on my clothes, shoes, floor, lawnmower, bike... 


May 23, 2012

Engine Stand and matching numbers

Last Monday I picked up the B20B engine block and the manifolds. Looks really good!  Sam put in the new "hard to get" cam bearings, probably the last ones in Australia.
I discovered the old expansion plugs were also gone because of the bath... another item to put on my wish list.
Whoow, the list is getting longer and longer and longer...

I bought some high tensile bolts 7/16 and mounted the block on the engine stand. After that I cleaned it with steelwool. Almost ready for the paintjob..

B20B block
Block after 13 years waiting for a bath, hone and face


B20 engine stand
B20B Block bolted to the engine stand

front view


Just waiting for a warmer day to paint the B20B as the temp needs to be at least 16C.

Today I also received an e-mail from Ulla (Volvo Cars Sweden) about the numbers and facts of the 122S;

"Hi Marc,
The following information is from the chassis register.
Model                122S
Chassis no.         316492
Type                  13334
Colour               99
Upholstery         431
Engine no.          363
Gearbox no.      306032
Body no.           316431
Reported OK    18 September 1968
Delivery date     8 November 1968
District              Australia
As it was the dealer that registered the car for the first time I have no information regarding former owners."

As the Volvo came with a box filled with bills, books, and other papers I checked the numbers with the info in the box........... the Volvo is 100% original, all matching numbers :)


  1. The body number is a serial number assigned to a complete body and is not the same as the chassis number which is only assigned to a complete car.
  2. The M40G gearbox is a variant of the M40
  3. The Bosch distributor 0231146078 for the Amazons is only used on the B20B
  4. This Volvo 122S was manufactured at the Torslanda plant near Göteborg in Sweden.


Promotional picture Torslanda plant - Volvo Amazon production  (1964)

More information about production and numbers can be found here


May 11, 2012

Rusty B20B engine


After being for more than 12 years dismantled most engine parts of the B20B were quite rusty.
I tried cleaning up the cylinder head, piston rods and some other parts with steel wool.
But it just wasn't going to get me too far.
After removing the grease and dirt it was obvious that the head and block need a light face and the bores a light hone. Another thing to do while the engine was still in parts was balancing the flywheel, crankshaft and piston rods.

After some surfing on the Internet I found Chris Milton Engine Developments just around the corner...
Specialised in high performance engines and engine developments and ... they have engine baths !

After bathing the parts the crankshaft journals needed a grind to get rid of pitted surface. Because of the grinding I couldn't use the original new bearings that came with the car :(
The chemicals in the bath are very aggressive so it's also necessary to replace the camshaft bearings after bathing the block.

The results are shocking good :
Volvo B20B head before cleaning

Volvo B20B head before cleaning

Volvo 122S B20B head after bathing and a light face
Volvo B20B head after bathing and a light face

Volvo B20B head after bathing and a light face
Yes, it's the same head

Crankshaft Volvo B20 before cleaning and grinding
Crankshaft Volvo B20B before cleaning and grinding

Crankshaft Volvo B20B after cleaning, balancing and grinding

Rocker shaft B20B before bathing and cleaning
Rocker shaft Volvo B20B before bathing and cleaning

Rocker shaft Volvo B20B after bathing, steelwool "polish"
The rocker shaft took a bath, after that I took it apart, cleaned it with steel wool and soaked it in oil.

Volvo B20B flywheel before balancing
Flywheel before balancing

Volvo B20B flywheel machine stepped and balanced
Flywheel machine stepped and balanced
see drilled holes between the 2 white lines

Friday I can pick up the block with the new cam shaft bearings and the cleaned inlet- outlet manifold, Pics of the results will follow. So it's time to find me some long bolts to mount the engine on the engine stand and start reassembling the B20B.

But... before reassembling the engine needs a good paint, red, Volvo red.